🎨 Sort imports using Prettier in a JavaScript Project inside VS Code!

I am a full stack developer, YouTuber and blogger!
👋 Hey developers! This post is about how you can sort import statements in your JavaScript/TypeScript/React/Node etc projects easily with Prettier in VS Code when you format the code.
What will you achieve?
By default, we import other files and libraries in an unformatted way. With Prettier and one of it's community plugins, we can easily configure it to sort import statements the way we want them automatically whenever we format code inside VS Code.
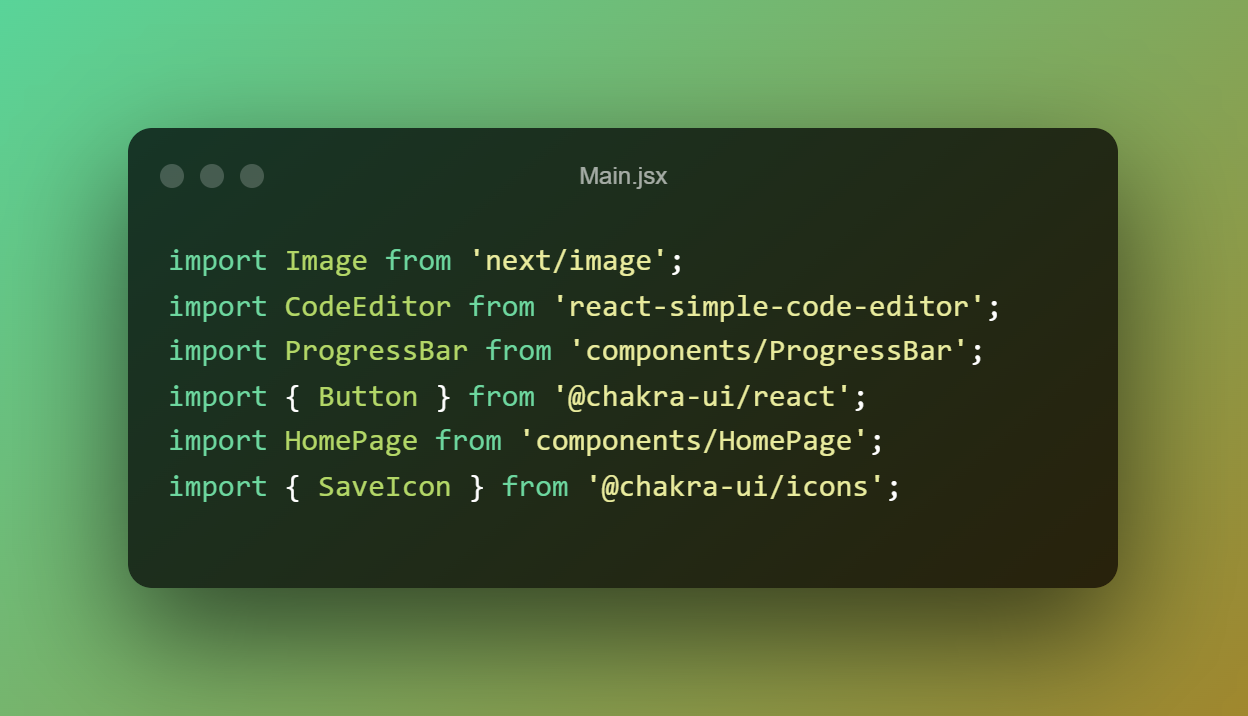
Before
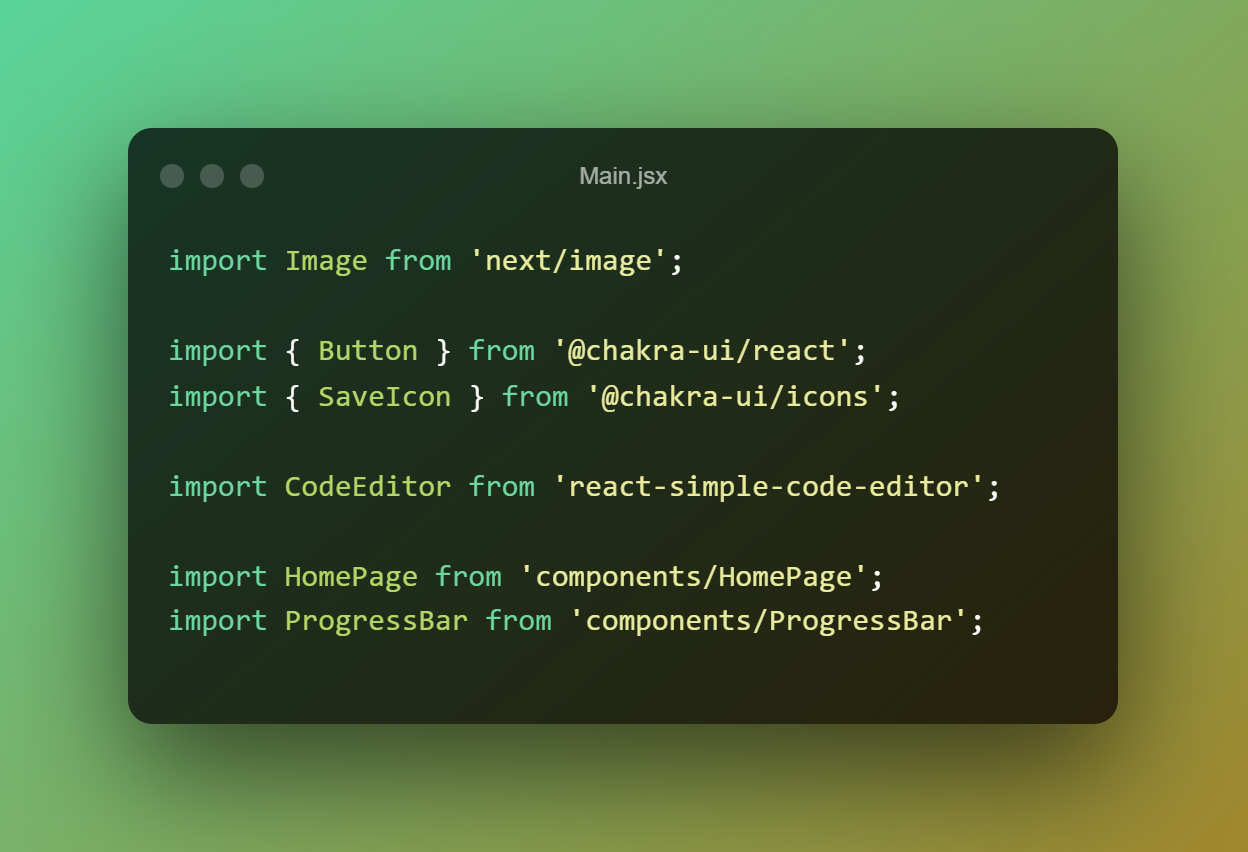
After
Installation & Configuration
In your JavaScript project, firstly you have to install and configure Prettier, you can do that easily by installing prettier as a dev dependency by running this command.
npm install prettier -D
After installing Prettier, we'll create a configuration file at the root of your project called .prettierrc. In that file, you can write JSON to configure prettier fitting to your needs. This is my configuration.
{
  "trailingComma": "none",
  "arrowParens": "avoid",
  "singleQuote": true,
  "printWidth": 80,
  "useTabs": false,
  "tabWidth": 2,
  "semi": true
}
Now whenever you format code, Prettier will format it according to your configuration. Next up, we have to install the plugin we are going to use to sort imports.
You can install it as a dev dependency simply by running this command
npm install @trivago/prettier-plugin-sort-imports -D
Sorting Settings
Once the plugin is installed, you can look around in their documentation on the NPM page, but we are going to keep it simple.
The basic setup is to add 3 options in your prettier config file. importOrder, importOrderSeparation and importOrderSortSpecifiers as follows:
{
  "importOrder": ["ARRAY OF IMPORT NAMES"],
  "importOrderSeparation": true,
  "importOrderSortSpecifiers": true
}
The main option in these is the importOrder option, in this option, you have to create an array of imports as you want to sort them. In my case, I wanted imports in this order:
import {} from 'next' // "next" imports at the top

import {} from 'other-lib'

import config from 'next-seo.config' // A single file

import Component from 'components/Component'

import helperFunction from 'utils/helperFunction'

import {} from 'assets/file'

import '@fontsource/font'

import 'others.css'
To configure this type of order, in the importOrder option, you have to pass an array of regular expressions.
My configuration was like this
{
  "trailingComma": "none",
  "arrowParens": "avoid",
  "singleQuote": true,
  "printWidth": 80,
  "useTabs": false,
  "tabWidth": 2,
  "semi": true,
  "importOrder": [
    "^(next/(.*)$)|^(next$)", // Imports by "next"
    "<THIRD_PARTY_MODULES>",
    "next-seo.config",
    "^components/(.*)$",
    "^utils/(.*)$",
    "^assets/(.*)$",
    "^@fontsource/(.*)$",
    "^[./]" // Other imports
  ],
  "importOrderSeparation": true,
  "importOrderSortSpecifiers": true
}
Here, "<THIRD_PARTY_MODULES" is provided by the plugin itself to place any other libraries in between. By default all third party modules will move at the top.
Now, you can go ahead and enable Format on Save setting inside VS Code to format code on save and install the Prettier extension too for the same.

Format script
A quick way to format all the files is by going into your package.json file and adding a script to it like this:
"scripts": {
  "format": "prettier --write \"./**/*.{ts,tsx,json}\""
}
You can refer to Prettier's CLI documentation for more information.
It's better to ignore some files and folders so that they don't get formatted as well by Prettier, for that you can create a .prettierignore file in the root of your project and you can simply name the files and folders you don't want to format. Just like .gitignore.
This is my .prettierignore file:
.next
node_modules
*-lock.json           # package-lock.json
Then you can run the npm run format command in your terminal and it will format all the required files in your project as per your configuration.
I hope this post helped you make your code look more clean and elegant and readable. If it did, please leave a like!
Comment down your thoughts! There is always room for improvement so let me know your suggestions on this project!
Connect with me on my YouTube channel and my Twitter 😉
Thanks for reading ✌


