💥 Introduction to Jotai | The best React state management library?
Primitive and flexible state management for React

I am a full stack developer, YouTuber and blogger!
Hello friends 👋
What is it and how I found it
So Jotai is a state management library for React, and it is just so easy to work with when compared to Redux, Flux, etc.
I found this interesting package looking at Ashik Chapagain's Hashnode + Clerk hackathon submission. Read the article.
I saw that he used Jotai for React state management and I had heard about it before that it was very easy to use it.
I finally looked at it and at the first glimpse of the code 🔥. I felt it's the best!
The problem
Managing state in React is hard. Trust me, when you build a large application you will get confused in some way passing props from component to component. This is known as prop drilling which is fine in small apps but in medium and large scale apps, it's hard.
Context API is a way to manage state which I cover in this article. But this library feels the best.

Source: https://www.geeksforgeeks.org/what-is-prop-drilling-and-how-to-avoid-it/
The code
So let's now jump to the most exciting part which is how should it be used in our React app! The first step is

Installing jotai via npm or yarn
npm i jotai
# or yarn add jotai
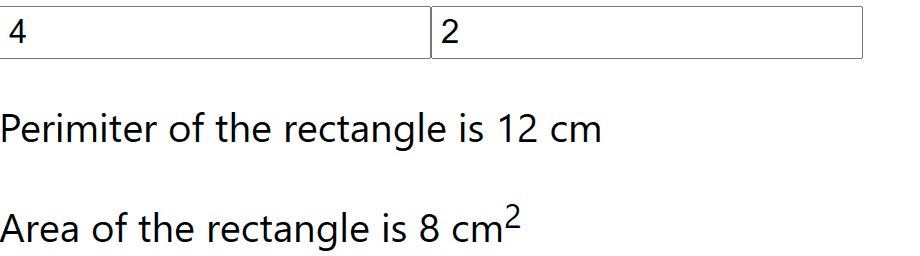
After that is installed, in your React app, you can create an atoms.js file. And simply create and export an atom in that file with a default value. For eg., lengthAtom and breadthAtom are atoms with the value of 4 and 2 respectively.
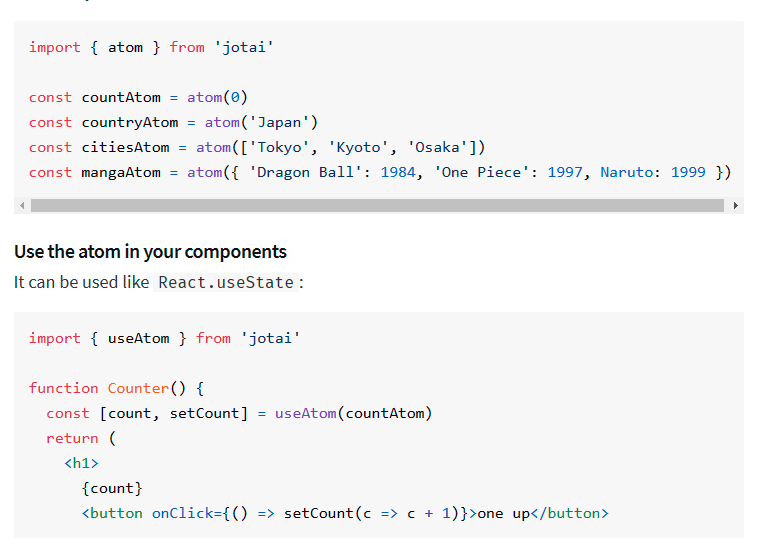
An atom is simply a holder for our state which we can use then to get access to our state.
import { atom } from 'jotai';

export const lengthAtom = atom(4);
export const breadthAtom = atom(2);
Then simply import the useAtom hook and the atoms from the file we created and pass those in useAtom in our component. And we get back the same thing we get back from useState which is the best part of this library.
import React from 'react';
import { useAtom } from 'jotai';
import { lengthAtom, breadthAtom } from './atoms';

function App() {
  const [length, setLength] = useAtom(lengthAtom);
  const [breadth, setBreadth] = useAtom(breadthAtom);

  return (
    <div>
      <input
        type='number'
        placeholder='Enter length'
        value={length}
        onChange={e => setLength(parseFloat(e.target.value))}
      />
      <input
        type='number'
        placeholder='Enter breadth'
        value={breadth}
        onChange={e => setBreadth(parseFloat(e.target.value))}
      />
    </div>
  );
}

export default App;
There is also a way to create computed properties like in Vue. We create an atom for that as well, and by using the get() method, we get the value of an atom and we use the same hook to get the state back.
In this example, I am creating two atoms that depend on the lengthAtom and breadthAtom. When the state changes, the new atoms will change too.
import { atom } from 'jotai';

export const lengthAtom = atom(4);
export const breadthAtom = atom(2);

export const perimeterAtom = atom(
  get => 2 * (get(lengthAtom) + get(breadthAtom))
);
export const areaAtom = atom(get => get(lengthAtom) * get(breadthAtom));
And then in the component, this is how we use it. We render out whatever the perimeter and the area is depending on the values
import React from 'react';
import { useAtom } from 'jotai';
import { countAtom, isCountEvenAtom } from './atoms'

function App() {
  const [count, setCount] = useAtom(countAtom);
  const [isCountEven] = useAtom(isCountEvenAtom)

  return (
    <div>
      <input
        type='number'
        placeholder='Enter length'
        value={length}
        onChange={e => setLength(e.target.value)}
      />
      <input
        type='number'
        placeholder='Enter breadth'
        value={breadth}
        onChange={e => setBreadth(e.target.value)}
      />
      <p>Perimeter of the rectangle is {perimeter} cm</p>
      <p>
        Area of the rectangle is {area} cm<sup>2</sup>
      </p>
    </div>
  );
}

export default App;
Here's how it works like:
Read more on their docs, which is fantastic!
Let me know what do you think about jotai as the best state management library for React.
Until then, peace out ✌️


